Saturday, November 14, 2009

What a Beautiful Saturday!

It's been an amazing day.  It got up to 70 degrees, with clear skies and an occassional breeze.  And, I don't know what's in the air, we've been listening to great love songs again all day today!

Heidi and David's wedding rings are finished and ready for them.  If I use only one word to describe them, they are  . . .  Spectaular! 

Or, Gorgeous!

It's only fair that they get to be the first people, other than Pat and I, to see them.  So I'm going to wait until tomorrow, or maybe Monday, to post photographs of them.

Until then, here's one that I took this Spring of one of our white trilliums in full bloom.

It's been that kind of a day today!

Friday, November 13, 2009

Into the Kiln!

I really like to listen to music as I work.  Normally I'm tuned to 88.7 FM, a really good eclectic NPR station down the mountain in Spindale.  But I'm not really into an hour of Frank Zappa, so at noon I tuned to 96.5 as I was working on the waxes for Heidi and David's rings.

All I can say is they must have great 'wedding karma'!  This station has been playing great love songs all day long!  It's been amazing and Fun and really helped to keep me focused on what's really important about what Pat and I are doing!

After making the new mold I shoot fresh waxes of both rings.  Now came the tricky part . . .  I cut the Ridgeline sections that we're casting in gold from each ring.  Here they are sprued together and ready to invest.

I deliberatley over-sprued their rings, and even ran an extra sprue up to the heads to ensure they turn out perfectly.  Sorry for the blurry photo!

I don't know if I mentioned it, but I really like to cast pairs of wedding bands together.  So these two flasks went into the kiln together to share the same five hour burn out cycle.

The first hour is at 300 degrees, then the wax tray is pulled out and the temperature is raised to 700 degrees.  Then an hour at 1350 degrees.  At the third hour I turn the flask over and they spend another hour at 1350 degrees.  They spend the fifth hour cooling down to 1150 degrees.  I'll pour the gold flask first and then I'll pour the silver rings' flask.

All I can say is that these rings must want to be made!  It's a perfectly behaved burnout cycle, they've hit each time and temperature mark perfectly!

They'll be devested and spend the night in the pickle.  Then tomorrow we'll carefully de-sprue, grind and buff, solder the gold Ridgeline plaques in place and set the stones and Heidi and David's Wedding Rings will be ready!

And I'm still listening to some truly great love songs!

More Mold Making

So going back to yesterday/Thursday . . .  Checking the temperature on the vulcanizer as it pre-heats to 307 degrees while I begin packing the mold.

Because of the thickness of this ring I used my 1 inch mold frame and 10 sheets of Castaldo Gold Label Rubber.

Beginning to pack the mold.  Every nook and cranny has to be well and throughly packed and the rubber sheets have to stay in the same alignment.  Each layer requires 7 minutes in the vulcanizer.  Sorry, there aren't more photos of this stage because Pat was dealing with the car and I got involved with the intriquicies of packing the mold!

Baking the mold!  On the left and the bottom you can see the extra rubber being forced out as the pressure is increased.

Now where are my notes?!?  This is why I zerox each master and then make notes right on that sheet!  It takes a certain amount of visualization to cut the mold, but notes and illustrations sure help when it's time to start cutting!

Pat's back and all is well.  Here I'm beginning the make a parting line cutting around the outside using a #11 scalpel.

Beginning to make the keying cuts; each corner will have a pyramid shape facing in alternating directions to help ensure the mold mates up perfectly.

Swithing to my #12 curved scalpel blade cutting along the sprue former and spreading the mold as far as I can as I cut.  (Jeepers, I've put on weight!)

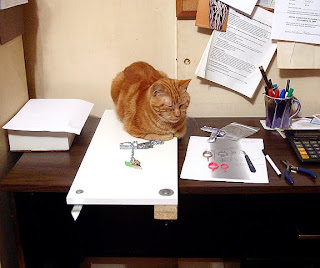
A closer view as I make what are called choppy wave cuts.  They'll help the mold sides align.  This is a mold cutting board that I made to fit on top of my old paperwork desk.  When I need it I clamp it in place and the weight of the desk is critical as you're using a lot of pressure when cutting a mold!  The bottle opener swivels underneath when not in use.

This mold was too thick for the pony clamp I have on an adjustable chain.  It was just more efficent and safe to use my hands to pry it open as I cut.  Here I'm using the straight scalpel to begin cutting the center plug free.

More shoppy wave cuts along the sides with the curved blade and then I was able to finish cutting the plug free.  Once the center plug is free the master can be removed and the rest of the mold cut in two.

Finally, a two-part mold!  Each cut has to be carefully planned to prevent parting lines, or flash, in the wax.  Ideally the cuts should lie along or thgough an edge.  Yes, it takes a little bit of practice.

Before I can use the mold I have to finish it by making relief cuts.  They help the mold to flex, but more importantly they make it possible to remove the wax from the mold.

Here's a view of the plug side of the mold with relief cuts under it.

This isn't a very good shot but it gives you some idea of the relief cuts on the ring side of the mold.  The four little black dots in the center are where the prongs will be; each one has its own relief cut.

That's the basics of packing and cutting molds.  It's not that hard, it's intricate and it takes time, practice, and a fiddly attention to detail.  Well, strong hands help too!

This is a good mold.  It shot the first test waxes well and I didn't have to go back and cut any extra relief lines.

Later I went back into the ofice because I realized I had forgotten to put everything away . . .  and there was Sam, ahem, "guarding" the new wax for David's ring!

Thursday, November 12, 2009

Quick Update


This is a view of the Ridgelines that will be gold in David's wedding ring.

The ring is sprued and polished and ready for molding!  Any blemish no matter how small or insignificant will be in the mold, so everything has to be as perfect as possible.

This is where I left off early Wednesday evening.  The weather was bad and traffic terrible, especially with all of the traffic detouring because of the I-40 closure.  So I stopped early and drove us to make our Weaverville delivery.

Today has been an adventurous day!  Pat is heading up a sub-committee of the Guild's Education Committee and is just beginning what may turn into a really neat long term project.  Their first meeting was this morning.  Unfortunately on her way home she locked her keys in the car!  And, for some reason, our home phone is acting up again.  The wait for a cab was going to be more than an hour.  So she decided to walk to the branch library and email me.

Only I was being good and wasn't online, I was working on the mold!  Fortunately one of our kind friends at Guild Crafts gave her a lift home.  So we had a late lunch, talked for a bit.  Then off she went in a cab to get the car.  Whew.  We were both off course for a good part of the day.  But all's well.

The mold came out beautifully!  Here's a view from master to wax on top of my notes for this mold.

I'm running about half a day behind where I want to be right now.  So tomorrow morning I'll be slicing and dicing waxes, spruing both rings together and the gold Ridgline sections also.  Then investing and burning both flask out.  Once they get into the kiln I'll come back and post more detailed photos of the mold making and cutting process.

Since he's on my lap right now purring and wanting a cuddle, here's a photo of Sam being a wild cave tiger early this April.


Wednesday, November 11, 2009

More Progress

Here are some quick views of the progress on David's ring!  Fresh out of the pickle. . .


After grinding and detailing . . .


It's a handsome ring!


Next upis spruing it and a final high polish buffing session.  Then Tom gets to mold it and begin the serious work . . .

Progress & Shipping!

I cast the master of David's wedding ring last night.  Running a standard eight hour burnout cycle, that became ten.  The blue carving wax has a higher melting temperature so it required an extra hour during the first temperature step.  Then, because we used styrene for the Ridgeliens, I added an extra hour to make the 1350 degrees heat soak stage four rather than three.  Then the final hour at the "cooled down" to 1050 degrees for casting.

I poured at 8:37 PM and all went well.  Then fifteen minutes for the flask to cool enough to quench safely.  Then I could finally quench and take a look at the ring!  (You never know until the piece comes out of the quench bucket.)  It looked good.  So into a glass jar in the ultrasound for devesting.  After and hour I put it into another jar for pickling while in the ultrasound.

It spent the night in the pickle.  I checked it just a minute ago and it looks great!  So it's time to pull it, neutralize the pickle and get to work on it!  (Oh, pickle is a very mild acid solution used after every soldering or heating step.  It's neutralized with baking soda.)

So next I'll de-sprue and grind the ring.  Then a fine grinding step, then a high polish buffing.  Then it goes to Pat for detailing, texturing the base of the Ridgelines areas, and re-cutting the seat for the stone if it needs it.

Then the ring comes back to me for final approval and then molding!  I'll try to take more photos as we go today.  In the meantime, here's a photograph I took this June of the 'watering hole".


Yesterday we finished the special order ring so it's shipping today.  We have another special order and a re-stringing job finished and ready to ship off to Arrowcraft too.  It's going to be a busy day and it looks like we may have lots more rain coming.

Tuesday, November 10, 2009

Catching Up!

I spent the weekend and part of Monday battling such bad connection speeds that I wasn't able to keep up with our posts!  (Also know as, "Argh!")  Lets see, where were we ?

Pat got David's ring to this point before passing it on to me.  Normally we construct the Ridgelines in metal.  For this project we're making them using techniques I developed a number of years ago.  In one way or another I've always been a modeller, so using styrene is very natural for me.  Here's a view of how the Ridgelines look roughed it in styrene plastic.


I spent a good part of Monday smoothing the ends of each joint and luteing the stryene then spruing and investing this ring.  Of course I forgot to take a single photo of that step, which is a shame because it was really looking good then.  Once it's cast we'll carve the tops of the Ridgeliens into curving surfaces.  Then a couple of more steps and David's wedding ring will be finished!

Here's a view of V's special order all sprued up and ready to be invested.  I cast it Monday afternoon, running the burnout cycle while I worked on David's wax.


Late Friday afternoon my cousin Susan visited on here way back home.  It's always nice to see Susan!  Though we might have been a bit boring, since all we had to talk about was work.  Susan did enjoy looking through some of the recent photos and our flip book.

We had planned to visit our friends David and Melanie Grant at the Dillsboro Pottery Festival Saturday.  But we got started late.  By the time Pat got home from delivering to Weaverville it had tuned into a beautiful day and promised to get even prettier.  So we decided to stay home and plant bulbs!

So, of course, we went to Lowe's to see what they still had.  No luck there, so on to The Home Depot.  Bingo!  We picked up a couple of new packs of crocus, 6o more in total and a couple of bags of mulch.  I had to get three of the incredible, and edible, red mustards they had too!

Then we stopped at Ingles for lunch and dinner supplies.  And I rediscovered their bulbs!  Hmmm . . .  the 'wild tulips' looks exactly like the Tulipa kaufmanniana that I so love ~ and lost when I re-did the sidewalk bed a couple of years ago.  So we got a couple of boxes of them too!

96 bulbs in a small area in the sidewalk bed, 60 crocus and 36 of the tulips.


Top planted with blue pansies.  I think this should be pretty spectacular in the Spring!

It seems fitting that over the weekend I rediscovered this photo of Okay, my favorite, in one of his favorite spots about a month or so before his final illness.  He was a Great Cat and I still miss him.

Wednesday, November 4, 2009

Wedding Rings

Here are some images of the beginning of a new commisssion; wedding bands for Heidi H. and David M.  Heidi fell in love with one of our asymmetrical Ridgelines ring designs when they were at Guild Crafts recently.

Her ring will be a size 7 and 1/2 and will feature an ice blue topaz, his will use the star ruby from his Father's ring.  We'll use the gold from his Father's ring to cast seperate Ridgelines plaques that we'll then solder into their rings.

David's ring will a size 13 and 1/2.  So here's Pat beginning to rough out his ring in carving wax.

A closer view of the rotary file.


The pink wax ring is the design of Heidi's ring that Pat is matching.  For David's ring we're scaling the whole design up to match his ring finger size.  To keep it all in scale we're enlarging the ring so it will be 10 millimeters wide at the top.

Here Pat is using one the hand gravers that were her Uncle Ambrose's.  Ambrose was a Master engraver, gunsmith and jeweler.


More hand work.  Here you can see how the surfaces have been refined.  Pat is using a graver to smooth the encised area where David's stone will eventually be set.


More hand work as Pat test-fits the star ruby from David's Father's ring.


It's been so long and we've been so busy that I haven't been updating our blog.  So to get started, here are a few recent images.  Next will be posts for Heidi H. and David M. as we work on their Wedding Bands!  As we go I hope to add even more images from the last few months . . .


Our friend Phil Brown,
at the end of the Southern Highland Craft Guild's October 2009 Fair.  Phil is a master bird carver, his wife Gaye is one of very favorite potters.  They're wonderful people and some of the best booth-neighbors anyone could ask for!  Pat and I think so highly of them, and of their hard-working family, that I am at a loss for words to describe them . . .

This piece of ours,

"Leaf in Shadow", is in the Guild's Permanent Collection!