Wednesday, November 4, 2009

Wedding Rings

Here are some images of the beginning of a new commisssion; wedding bands for Heidi H. and David M.  Heidi fell in love with one of our asymmetrical Ridgelines ring designs when they were at Guild Crafts recently.

Her ring will be a size 7 and 1/2 and will feature an ice blue topaz, his will use the star ruby from his Father's ring.  We'll use the gold from his Father's ring to cast seperate Ridgelines plaques that we'll then solder into their rings.

David's ring will a size 13 and 1/2.  So here's Pat beginning to rough out his ring in carving wax.

A closer view of the rotary file.


The pink wax ring is the design of Heidi's ring that Pat is matching.  For David's ring we're scaling the whole design up to match his ring finger size.  To keep it all in scale we're enlarging the ring so it will be 10 millimeters wide at the top.

Here Pat is using one the hand gravers that were her Uncle Ambrose's.  Ambrose was a Master engraver, gunsmith and jeweler.


More hand work.  Here you can see how the surfaces have been refined.  Pat is using a graver to smooth the encised area where David's stone will eventually be set.


More hand work as Pat test-fits the star ruby from David's Father's ring.


It's been so long and we've been so busy that I haven't been updating our blog.  So to get started, here are a few recent images.  Next will be posts for Heidi H. and David M. as we work on their Wedding Bands!  As we go I hope to add even more images from the last few months . . .


Our friend Phil Brown,
at the end of the Southern Highland Craft Guild's October 2009 Fair.  Phil is a master bird carver, his wife Gaye is one of very favorite potters.  They're wonderful people and some of the best booth-neighbors anyone could ask for!  Pat and I think so highly of them, and of their hard-working family, that I am at a loss for words to describe them . . .

This piece of ours,

"Leaf in Shadow", is in the Guild's Permanent Collection!

Thursday, September 3, 2009

Market Day!

This is posted to stir Bob's appetite!

Off to Market after stopping to talk to the littlest greeter!


Beautiful fresh locally grown veggies.


These three are some of our favorite local farmers. She is our favorite bank teller and their baby was born on Tom's Birthday! Their vegetables are organic and the plants they sell have been some of the best survivors we've put into the yarden.


A view of the Market from the other end. Our favorite Market is this one held every Saturday morning in one of the parking lots at UNC-Asheville. Great vendors, there's always shade and often a breeze. It's always Fun to see what's new and fresh.


We were too late for fresh bread, but we still were able to find everything we needed, and a few surprises too!


I inheritated this cutting board from my Mother and I use it everyday for prepping veggies! It was made by a student at Berea College and I bought it as a gift for her at the Folk Art Center many years ago; long before Pat and I ever thought we'd be in the Guild ourselves!

Corn and flat Italian parsley picked this morning, with a great Chevre n' Chives from the Three Graces Creamery.


A great surprise to find! The most beautiful turnips we both think we've ever seen! They'll probably become a turnip au gratin cooked in my favorite magic pot made by our frined Davd Grant. This casserole was made by our friend Hamilton WIlliams.


Left to right: sweet pepper, a couple of egg plants, more cukes, a gorgeous red bell pepper, really tasty tomatoes, a wonderul little melon, a couple of the red candy onions and an asian cucumber.


Fresh wax beans in another bowl that our friend Gay Brown made and gave to us. (One of a set of three nesting bowls.)


Shopping is fun and hungry work! So once home Pat made us a great lunch.

A bean salad of black beans and garbonzos, perfectly seasoned and topped with avocado and a little salsa. Chevre with rye crisps and fresh cukes and tomatoes.


The plate was made by our friend Hamilton Williams and is from our set of ten.


We both put in sometime cleaning up and doing house work. And then we had a hard time just settling down and loafing! It was such an intense and productive week that we were both a little antsy. We did finally relax and sprawl for awhile. It was a nice afternoon.

Then it was time for me to get busy and make dinner!!!


Grilled shrimp kabobs! These are 20-21 count shrimp just in from the coast that we bought at the market. They're skewered with red onions, red and yellow bell peppers and mushrooms. There also a few sage leaves in there. The veggies and then the shrimp were quickly marinated in a mix of olive oil, garlic and salt and pepper. Oh yeah, a dash of tobasco and Worcestershire sauces too.


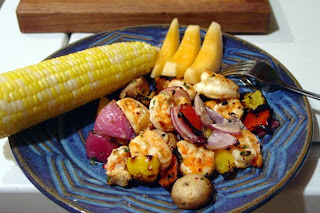
Platted up with grilled fresh corn and some of the melon.


Good eats indeed!


Followed by a nice relaxing evening together.


Friday (posted much later)


Sterling castings fresh out of the pickle. B's custom order is in the middle. Tom de-sprued these then ground and buffed B's ring before it went to Pat for sizing and mouting the peridot. Then Tom did the final buffing when he buffed the two custom gold wedding bands.


The big flask went into the kiln at 9 AM, right as the kiln had warmed to 300 F. This one will be an eight hour burnout cycle because of the size of the flask.


The custom gold rings are ready for their final buffing!


This is a quick sketch that Pat did from a customer's description. Tis is going to be a "fun" job: she wants her individual bracelets rounded, soldered together and then two pairs of lapis earring converted and soldered to the top of her new bangle bracelet.


Four pairs of locking tweezers being used to hold the ends in place for the first solder. (We've already discovered that one of her bracelets isn't usable, since it's hollow and filled with pitch. So we can't apply any heat to it.)


Making the first solder. We're going to have to start at one end and join the individuals bracelets together, then attach them as we go. Most of these bracelets are all different sizes too, so they'll have to be shortened as well.


Just as Pat was ready to bezel-set the peridot in B's ring she got mugged!


Sam said it was break time and he needed a cuddle right now!


You just have to take a minute and smile, and give him a good cuddle-love!


Then you can get back to work.


From the customers' sketch of what they wanted their wedding bands to look like.


Pat took this photo years ago.  She referred to it when she was carving the waxes to help her visualize the mountains' contours, layering and textures.


The waxes the customer's approved . . .


To their wedding bands made real! 14 karat yellow gold with bezel-set sapphires.


The interiors, showing the open bezels.


Meanwhile Tom's been working waxes and minding the kiln.  Halfway through the heat soak stage, after turning the flask right-side up (what was the bottom, with the pouring cup and gate area now pointing upwards) at 4 PM the kiln ramped it's temperature up to 1450 F !!! Which is not good!

Investment is a special plaster mixed with water used for lost wax casting. It's funny stuff. It's delicate and fragile stuff, and it has to be heated slowly to drive the moisture off without causing steam and cracking it. The wax originals have to be melted out, the wax tray removed, and then the wax residue is literally burned out. Once investment has been heated to 1000 F it's pretty tough and the temperature can be quickly run up to 1350 F for the final burnout before it's lowered to whatever temperature the flask and metal will need for the actual casting.

Unfortunately though extended temperatures over 1375 F (or 1450 F depending on the investment) causes investment to break down! Fortunately for us, Tom caught the temperature pretty quickly ~ it had only run up to 1450 for a few minutes and there is always a fairly considerable lag betweent he kiln temperature at that of the flask, especially with a 3" X 5" flask like this one.

Still, it was an exciting moment when he checked the kiln temperature!

Pat left to make a delivery. Tom poured at 5:45 PM.
This is a view of the top of the flask right after casting. It's still sitting on top of the vacuum chamber (the other end of the flask is open and the gasses are drawn away through the investment as the metal flows in, hence vacuum-assisted casting).


Then Tom started a vegetarian spaghetti sauce before it was time to quench. This sterling alloy really does best if it is allowed to really cool, otherwise you can have heat-stress fractures which is never good ~ especially when you have so much time and work tied up in one flask!
The quench went well and Pat got home in time for a good dinner. Tom's Friend John came over for a Boys' Night and Pat deservedly loafed and watched a couple of videos.
Tom actually loves his old Kerr Maxi-Electro Melt. (Think of it as a glorified coffee pot for melting metals!) This one is an older, but large capacity, one that we bought second-hand from another Jeweler many years ago. He has a different graphite crucible for each metal that we cast (gold, silver, and bronze).
Here's what the crucible looks right after a pour. It's at 1850+ degrees Farenheit and it really glows!


Now, if all went well, I may have actually gotten this post from last Friday to upload correctly!!! 

Friday, August 28, 2009

Busy Thursday!

Thursday was a good productive day for both of us. The flask went into the kiln at 8:45 AM, after warming it up to 300 F. I had to go outside and check out the day. Here are the boys . . .


They're guarding us from the Morning Glory that wants to take over the world!


Here are the custom wedding bands I cast Wednesday. All devested, pickled and ready to be de-sprued!


These were cast using the customers' own gold. I prefer to cast with at least 50% new metal to ensure the best quality of the castings. In this case they supplied their own gold in the form of rings they had had made before.


Because there was just enough gold I had to be very careful about how they were sprued. Frankly I spent hours thinking about it and weighing sprue wax and thinking some more!


This is a definte case where experience pays off. My spruing worked the rings turned out and this is what was facing Pat first thing in the morning!


After checking the kiln I checked all of the waxes I was planning to sprue. Like candling eggs, here's what you don't want to see!


Air bubbles in the wax will end up as holes in the final cast pieces. Throw that wax away and use another one.


Here are the waxes for the next tree all cleaned up, sprues cut at 45 degree angles and they're ready to go.


The sprues on the gold bands was so heavy that Pat had to use a miniature cut-off disc to seperate them. Here she's pre-polishing the interior of one of the rings.


Using the same rubber wheel on the outside.


After the cleanup and re-texturing and first buffing she soldered the heads on each ring. Here she's bezel setting the sapphire.


Yes, you use a small hammer to close the bezel ~ very carefully!


I added an extra 30 minutes to the 1350 F heat soak stage for this flask because it was lunch time and I was updating this blog! Here's a peak inside the kiln right after I turned it down to cool to 1000 F for the next two hours before casting.


I cast the flask with our three Ridgelines Rings at 2:56 PM. I got distracted spruing waxes so I didn't quench until 3:25 PM. It went well and all three rings turned out perfectly! After they went into the unltraonic for devesting I got back to spruing the last waxes for Friday's casting.


The waxes all sprued, smallest at the top largest and heaviest at the bottom. This is how I double-check as I go. They'll be burned out in a 3" diameter flask, so I've marked where 2" wide is so I can make sure that none of the waxes' ends are too far out.


All sprued and on their rubber base ready for the flask. The Total Wax Weight is 12.5 g. The sterling I use has a specific gravity of 10.4, so I'll be casting 130 g or around 4 1/3 ounces for this flask.

Since I work with vacuum-assisted lost wax casting, all of the wax will be melted out (lost) leaving voids or negative spaces in the investment.

The flask goes into the kiln in this position.

Before it is time to pour the flask has to be turned over so that what's now the bottom (the sprue/gate and casting cup area) will become the top.


And this is how it will look!
Pat finished up before I did, but I managed to finish investing and cleaning up around 6. I had to run a quick errand in the rain. She very kindly agreed that I should take a shower before getting into the kitchen! (As she said, "A clean cook is a happier cook!") Fast and easy meal using some great tortillini and the left over shreded chicken sald she made us for lunch.

Thursday, August 27, 2009

More on Yesterday

Yesterday Pat worked on bezels while I was minding the kiln and shooting waxes. Here are some of the steps each bezel goes through before we can use them.


A bezel after being soldered to the back plate, in all of its fire-scaled glory!


Triming the excess back off.


Bezels ready for their back edges to be ground even with the incredibly thin walls.


Grinding the edges even, without grinding into the side walls!


A freshly ground bezel.